Starting Point - Dewsbury Station. Finishing Point - Brighouse Station. Distance 9.5 Miles
I previously walked the Calder & Hebble Navigation from Wakefield to Dewsbury, in this part I continue from Dewsbury to Brighouse before completing the route with a walk from Brighouse to Sowerby Bridge. More about the route and its history can be found on the Wikipedia page.
Rail Map Online (Canal Maps) view
1894 Map
Dewsbury Central Station
To start this leg of my three part journey along the Calder & Hebble Navigation I headed to Dewsbury station. On my way to pick the canal up again where I left off at Savile Town Basin in Dewsbury I had a little railway walk. To begin with I walked from the surviving station in Dewsbury on the former LNWR route to the closed Dewsbury Central station on the Great Northern route. A bypass now occupies the trackbed of the GNR through the town, as the station was built on a viaduct the ground level buildings survive under the road.
Below - The former Central station entrance on the right and Station Hotel on the left.
Dewsbury Market Place Station
Heading south on Crackenedge Lane the Lancashire & Yorkshire Railway once had a prime spot on the plaza outside the town hall, nothing remains of the former station now. The station closed to passengers in 1930, the merger of the LYR and LNWR in 1922 prior both becoming part of the LMS a year later making it obsolete, it remained in use as a goods shed until 1961.
More about the various railways around Dewsbury can be found on the Lost Railways West Yorkshire website.
Below - Next to Rishworth Road a bit of railway retaining wall can be seen. Behind the building on the right the GNR went in to a tunnel, apparently the bricked up entrance to the tunnel is under the vegetation there somewhere. The retail park is built on the site of the GNR's Railway Street Goods yard.
1890 Map
Off Sands lane a foot and cycle path joins the GNR trackbed at Dewsbury Junction. The Ossett & Dewsbury Branch is now the Ossett Greenway foot and cycle path, on this occasion I took the branch heading south west, this was a link line between the GNR and the LYR known as the Headfield Branch and is also now a foot and cycle path.
Below - The viaduct over the River Calder.
Below - Bridge over the Calder & Hebble Navigation.
The path goes to the site of the junction with the L&Y and then heads north to Scarborough Street on the course of the line to Market Street. A stub of the L&Y line survives to serve a cement works, the buffers at the end of this freight branch can be seen alongside the path.
I left the railway path at the above bridge and headed north to Saville Town basin to pick up the canal where I left off in part 1.
Below - Saville Town Basin showing some of the buildings that survive.
1893 Map
Below - Bretton Road bridge.
Below - Thornhill Lees Locks where the Dewsbury branch meets the route from Wakefield behind me and the route to Sowerby Bridge in front of me.
1922 Map
Below - The top lock at Thornhill Lees, in the background the Midland Railway viaduct can be seen.
Below - The Midland Railway viaduct. This is part of the same route encountered in Part 1 that had been intended to connect Bradford with the Midland's main line to London St Pancras. It only reached the Saville Town goods yard just north of here before the First World War and subsequent merging of the MR with the L&Y and LNWR in the LMS made the plans a needless duplication. The route closed in 1950.
Below - The site of Thornhill Iron & Steel Works with Forge Lane bridge. Remnants of metal work from the steel works could be seen in the wasteland alongside the canal.
Below - Bridge carrying the former L&Y railway over the canal, this line is still open and used by trains travelling between Mirfield and Wakefield.
Below - The footpath bridge under the L&Y's Ravensthorpe branch, that route lost its final freight traffic in 1981 and has been converted to the Spen Valley Greenway foot and cycle path. This bridge is situated just north of the former Thornhill Junction, the greenway is accessed just north of the bridge where access has been built up the embankment from the canal towpath. More about the greenway can be found on the
Railway Paths website.
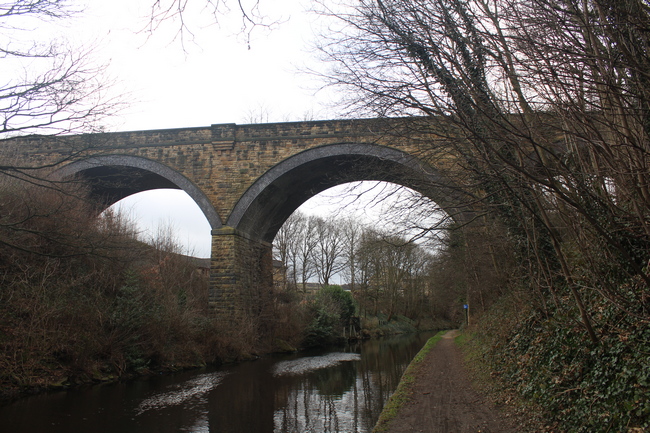
Below - The viaduct carrying the LNWR Leeds and Dewsbury line over the navigation. This is part of the main Trans Pennine route. Current upgrade plans would see the line electrified and another span of the viaduct (which would obstruct the original cast iron span from view from this angle) to widen it to four tracks across a 'grade separated' junction at Thornhill LNW junction (shown on the old map as Dewsbury Junction) where trains taking one direction at the junction don't block trains travelling the other way.
Below - New Cut Top Lock, this is the point where the man made canal section "New Cut" (also known as Long Cut) meets the River Calder and boating traffic travels along a navigable stretch of the river. The route consists of a number of sections of man made canal sections and river sections with the canals bypassing sections of river with weirs that have either been constructed for water powered mills or to maintain the depth of the river on the navigable sections.
Below - Looking out to the navigable stretch of River Calder from the lock.
Below - Looking back towards Dewsbury along the river. The barrier is to stop boaters missing the canal entrance and ending up over a weir further down the river. The old map shows an entrance to the Dewsbury Canal next to the weir, this canal would have allowed boats back on to the river as far as the bridge taking the L&Y in to Market Street station in Dewsbury, from here a canal would have been built to Saville Town Basin from the north. The old maps show the latter as incomplete and the former as a couple of mill ponds so it looks like this came late in the day for canal development and was not completed. Rail Map Online's canal map shows this route as conjecture. The Calder Valley Greenway follows the dry route of the Dewsbury Canal.
Below - The former Calder Wharf Mills wharf with a crane still in situ.
The towpath continues along the south side of the river, however the bridge that took it across the river at Greenwood Lock for the next section of canal is no longer there. I therefore left the towpath at Calder Road and walked along Huddersfield Road to Low Mill Lane where the north end of the canal section is accessible so I was able to walk to the junction at the south end and back.
Below - Greenwood Lock at the south end of the short Greenwood Cut.
Below - The Greenwood Cut
Below - Greenwood Flood Lock at the north end of the Greenwood Cut. Only one set of gate is provided on a Flood Lock as these are not used for a change of height but to act as a flood barrier protecting properties along the canal section if the river floods. These Flood locks can be found on the upstream ends of the canal sections.
From here there is just a short section on the river before the next canal section is accessed, the Shepley Bridge Cut. The towpath follows the north side of the river and crosses the canal entrance on a footbridge next to the Shepley Bridge that carries Steanard Lane over the river.
Below - The entrance to the Shepley Bridge Cut and bridge carrying the towpath over the canal. These bridges were designed for horses to use with ramps at each side rather than steps.
Below - Shepley Bridge Lock.
Below - Shepley Bridge Wharf.
Below - Wheatley's Bridge.
Below - Remains of the bridge that took the L&YR Cleckheaton Branch over the canal.
Below - Gill Bridge carrying Hirst Lane over the canal, the remains of a malthouse can be seen on the right of the picture.
Below - Lowlands Road with Bull Bridge in the distance. Industrial units still occupy the canal side including a boat building firm.
Below - The Legard Bridge Dock Yard
1907 Map
Below - Shepley Bridge Flood Lock
Below - The viaduct carrying the railway over the river. The barrier for the weir can be seen.
Below - The former Butt End Mill seen across the river.
The bridge that took the towpath across the river is no longer there, though the column in the middle of the river for it still stands. This meant a detour across Legard Bridge to Calder View, a footpath from there leads to the riverside. Note how there are a few arches under the railway where Calder View goes under the railway. Two of these arches were once occupied by the mill race for Butt End Mill.
Below - Butt End Mill now looking quite abandoned and derelict.
Below - Remains of the viaduct that took the LNWR Heaton Lodge & Wortley Line (better known as the Leeds New Line) over the river.
Below - Note the piece of steel plate from the viaduct sticking out of the towpath.
Below - Battye Ford Lock on the entrance to the next canal section, the Battye Ford Cut.
Below - The Batte Ford Cut.
Below - The South Pennine Boat Club's Marina.
Below - Footbridge over a short section of the Leeds New Line that remains in use. This section was reinstated to provide a chord connecting to the north side of the former L&YR line allowing grade separation at Heaton Lodge Junction. Unfortunately this junction was then butchered in the late 1980s but the current upgrade plans would see four tracks reinstated through the junction and electrification. What the upgrade plans won't see is this footbridge surviving here.
Below - The Batte Ford Flood Lock at the end of the Batte Ford Cut as the river is re-joined.
Below - A surviving towpath bridge across the river.
Below - The L&YR bridge over the river. The line was built as two tracks and widened to four. Today only the two tracks on the original stone bridge remain taking trains through Brighouse.
Below - Cooper Bridge Lock as the next canal section, the Cooper Bridge Cut, is joined.
Cooper Bridge Station
Here I took a little detour to the bridge under the L&Y line east of the canal as this was the site of Cooper Bridge Station. When the route was built by the then Manchester and Leeds Railway this was their station for Huddersfield, some 3.6 miles away. The subsequent LNWR route through Huddersfield would go on to become the main route between Leeds and Manchester and Cooper Bridge station closed in 1950.
The later station site was on the east of Cooper Bridge Road and was an island platform accessed through an entrance beneath the bridge. This station can be seen on the left of the old map above. All that survives of it is the bricked up entrance in the bridge.
Below - Former entrance to Cooper Bridge station.
The original station before the route was widened to four tracks from two was on the west side of Cooper Bridge Road. This consisted of platforms either side of the two original running lines accessed by slopes up the embankment sides.
Below - Could this bricked up arch in the bridge have been used to access the old west bound platform while the extra span of the bridge was added and the new station built?
The entrance to the Huddersfield Broad Canal was off the River Calder just west of here. Boat traffic from the Wakefield or Dewsbury direction would have had to travel over the Cooper Bridge Cut and double back on the river to access that canal.
Below - Cooper Bridge Lock, Lock 1 of the Huddersfield Broad Canal.
Returning to the Calder & Hebble Navigation and the short Cooper Bridge Cut, the buildings of Cooper Bridge Wharf survive as a health center.
Below - The former Cooper Bridge Wharf.
Again the bridge that took the towpath over the river where Cooper Bridge Cut joined the river is now missing. I was able to take a detour via Lower Quarry Road and a public bridleway, rejoining the river before it passed under the former L&Y railway line again.
Below - Kirklees Lock on the entrance to the Kirklees Cut.
Below - The lock paddle mechanism unique to the Calder & Hebble Navigation using a 3ft stick instead of the standard British Waterways windlass to operate it.
Below - The set of locks mid way along the Kirklees Cut.
Below - Just south of the canal was the Lancashire & Yorkshire Railway's sidings, in fact the boundary with the railway property was the edge of the towpath and the railway marked this with a few boundary stones.
Below - The canal mile stone shown on the old map along with one of the railway's boundary stones.
Below - The Kirklees Flood Lock as the Kirklees Cut rejoins the river.
The towpath runs up to River Street, here another detour on nearby roads is necessary.
The strip of land once occupied by the railway on the south side of River Street is evident, though the embankment has been partly removed when the bridge over River Street and its abutments were removed. On the north side of the street all sign of the railway has been removed and the site is occupied by a steelworks. This was where the Bailiff Bridge Branch left the main Calder Valley Route. I picked up that line at the site of Clifton Road Station near Brighouse and walked it to where it met the line towards Bradford at Wyke, details of this walk can be found
here.
A footbridge crosses the river to Huntingdon Street (not shown on the old maps). From here I took Armytage Road and Mill Lane to Brighouse Wharf.
Below - Brighouse Lower Lock.
Below - The upper basin and wharf buildings. At the time the boat jetties were being renewed.
An interesting feature on the old map is the tramway heading north east from the basins. This fanned out to quite a network of lines bringing coal from pits over a few miles around. Looking at the satellite images the course of the tramway can be made out, though it is not walkable and some buildings have been built over it. Remnants of the tunnel under Clifton Road can be seen.
Below - The wharf buildings, now a bar and restaauraunt.
Below - The bridge just off Wharf Street taking the towpath over to the north side of the canal.
I walked to Brighouse station, crossing the canal and river again on Huddersfield Road for a train home. My journey along the Calder & Hebble Navigation was completed at a later date with a
walk from Brighouse to Sowerby Bridge.